“Fried” Chicken Sandwich – Lite Cravings
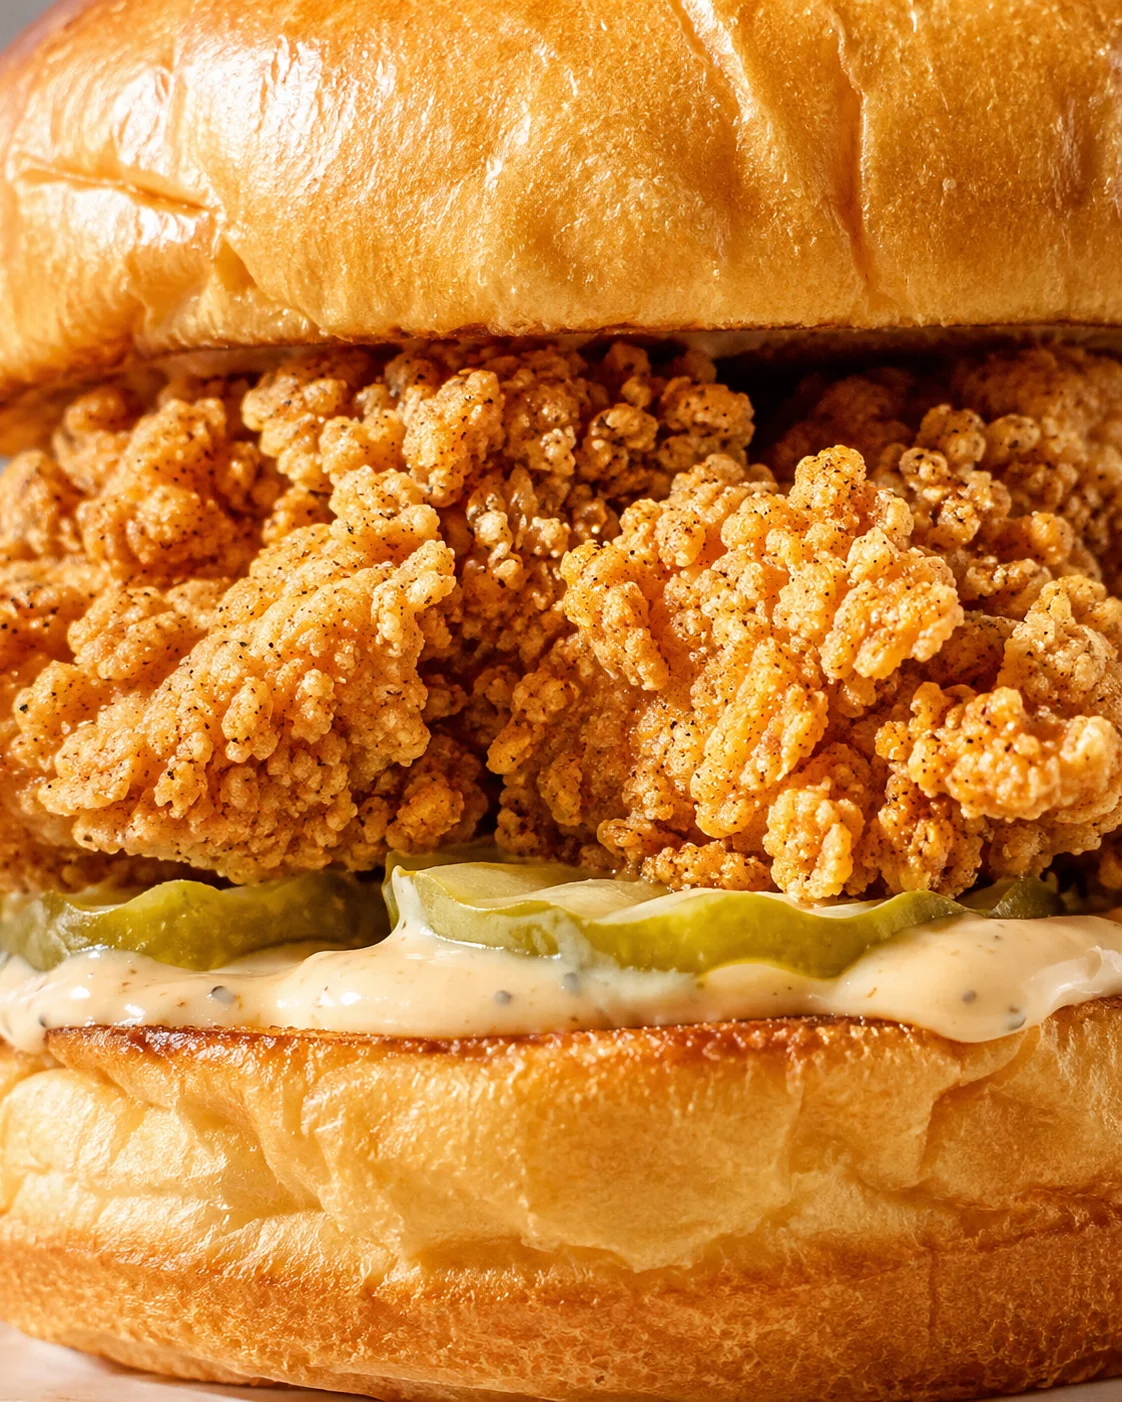
Honestly, is there anything better than that perfect combo of crispy chicken, soft bread, creamy mayo, and crunchy pickles? It’s like a flavor party and a texture hug all in one bite. So straightforward, yet so darn delicious!
I wanted to keep all those classic fried chicken sandwich vibes but lighten it up a bit. Just small tweaks like changing how the breading works make this recipe something you can actually enjoy a few times a week without the heavy feeling.
We’ve ended up making these sandwiches five times just in the past two weeks while perfecting the recipe! The chicken? It’s the main event. My goal was to nail that crispy, chunky coating that normally only deep frying can achieve. And honestly, it came out pretty darn close!
The secret? Adding a splash of milk to the flour mix. This little trick makes the coating clump up just right and gives that thick, crunchy feel without actually battering and frying deep in oil.
I swapped the traditional buttermilk soak for a thicker egg wash. Buttermilk is great when you deep fry because it sticks well, but for baking or air frying, it can slide off. The thick egg wash holds the coating better, which means crispier chicken without all the mess.
This is exactly what it looks like before cooking — already looking like the real deal!
Thanks to those little hacks, the breading has that beautiful craggy texture we all love. Just spray both sides lightly with cooking spray before cooking, and you’re ready to go.
What’s the best way to cook your chicken?
If you’ve got an air fryer, use it! It’s hands down the easiest and fastest way to get crispy, golden chicken every time. No air fryer? No worries! You can make this in the oven or even a skillet—the recipe covers all three.
The air fryer rocks because it’s quick and gives you a reliably crunchy crust. Oven baking works well but you’ll want to flip the chicken halfway through, and it takes a little longer. The skillet method is doable but you’ll need more oil and extra attention so the breading browns evenly.
Putting the sandwiches together
The fun part is customizing these sandwiches just the way your family likes. We love things spicy at our house, so I add cayenne to the breading and mix hot sauce into the mayo for an extra kick. The pickles are the perfect tangy counterpoint to cut through all the richness.
You can also keep it simple burger-style with regular mayo, lettuce, tomato, and onion. The calories and points stay about the same, so go with whatever flavors or toppings you like best!
For buns, brioche or classic hamburger buns both work really well. If you want a little extra crunch and flavor, sesame buns are a fun option.
We’re already dreaming up spin-offs like chicken parmesan sandwiches, Korean fried chicken sandwiches, and Nashville hot chicken sandwiches. The possibilities are endless! I’ll be sure to share any hits with you soon, but for now, enjoy this classic version that really nails it.
If a fried chicken sandwich makes your heart sing — with that crispy crust, soft bun, creamy mayo, and tangy pickles — then you are going to love this recipe. I set out to keep all the things that make that sandwich so crave-worthy, but slim down the oil and calories so you can enjoy it regularly, not just on special occasions.
Little technique tricks, like adding a bit of milk to the seasoned flour to make clumps and using a thickened egg wash, give you the crispy, crunchy texture of deep frying without the deep fryer. The air fryer is your best friend here for quick, consistent results, but I’ve included oven and skillet instructions too so you can pick what works for your kitchen.
In this post, you’ll find: a full ingredients list and step-by-step guide, three cooking methods, tips for different flavor versions—from spicy to classic—plus chef tips for maximum crispness, WW SmartPoints info, nutrition details, storage advice, and answers to your common questions. This recipe makes four sandwiches and takes about 35 minutes total (15 minutes prep, about 20 cooking).
- Why those little hacks (milk in flour, thick egg wash) really change the texture
- How to cook the fried chicken sandwich in the air fryer, oven, or skillet with the best results
- Flavor and assembly ideas—from Nashville hot style to Korean-inspired twists
- Storage tips, reheating suggestions, and FAQs to clear any confusion
Why This Version Shines
This fried chicken sandwich hits every mark you want in the classic version — crunchy, craggy breading, juicy chicken, creamy mayo, tangy pickles — but with way less oil and fat than your typical deep-fried fast food. It’s quick to pull together (especially in an air fryer), easy to customize, and light enough to be a weeknight regular instead of a once-in-a-while indulgence. Those small technique tweaks, like mixing milk into the flour and using a thick egg wash, work wonders creating that crispy, battered crust you crave without the mess and calories of deep frying.
- Healthier than traditional deep-fried sandwiches without sacrificing flavor
- Perfect for air-fryer cooking—fast, reliable crispiness with minimal oil
- Totally customizable—make it spicy (try an extra crispy Buffalo chicken sandwich), classic, or even international-inspired (like a Korean BBQ chicken sandwich with cabbage slaw)
- Lower fat, WW point-friendly with details included so you can track
Gather Your Ingredients
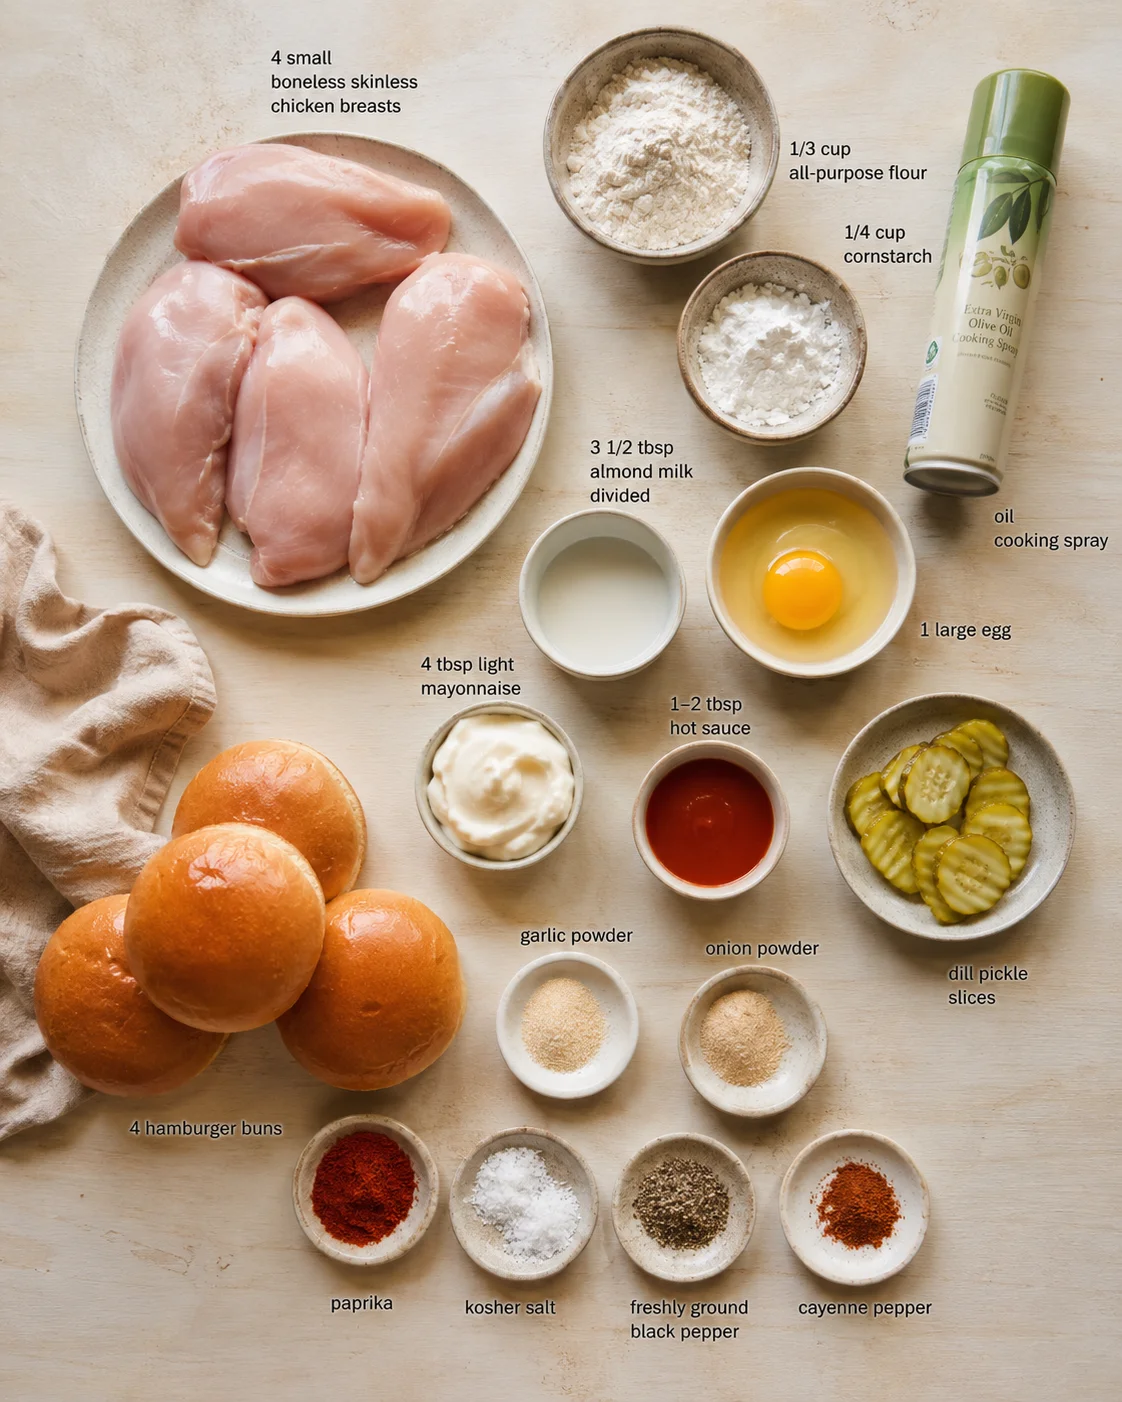
- 4 small boneless, skinless chicken breasts (or 2 large ones cut in half)
- 1/3 cup all-purpose flour
- 1/4 cup cornstarch
- 1 1/2 tsp each garlic powder, onion powder, and paprika
- 1 tsp kosher salt
- 1/2 tsp freshly ground black pepper
- 1/2 tsp cayenne pepper (optional if you want that spicy fried chicken sandwich)
- 3 1/2 tbsp almond milk, divided (or skim milk will work)
- 1 large egg
- Oil cooking spray
- 4 tbsp light mayonnaise
- 1-2 tbsp hot sauce (adjust based on spice preference)
- 4 hamburger buns
- Dill pickle slices
From Prep to Finish
- Pound chicken breasts to an even thickness and pat very dry with paper towels; set aside.
- Stir together all-purpose flour, cornstarch, garlic powder, onion powder, paprika, kosher salt, black pepper, and optional cayenne in a shallow dish.
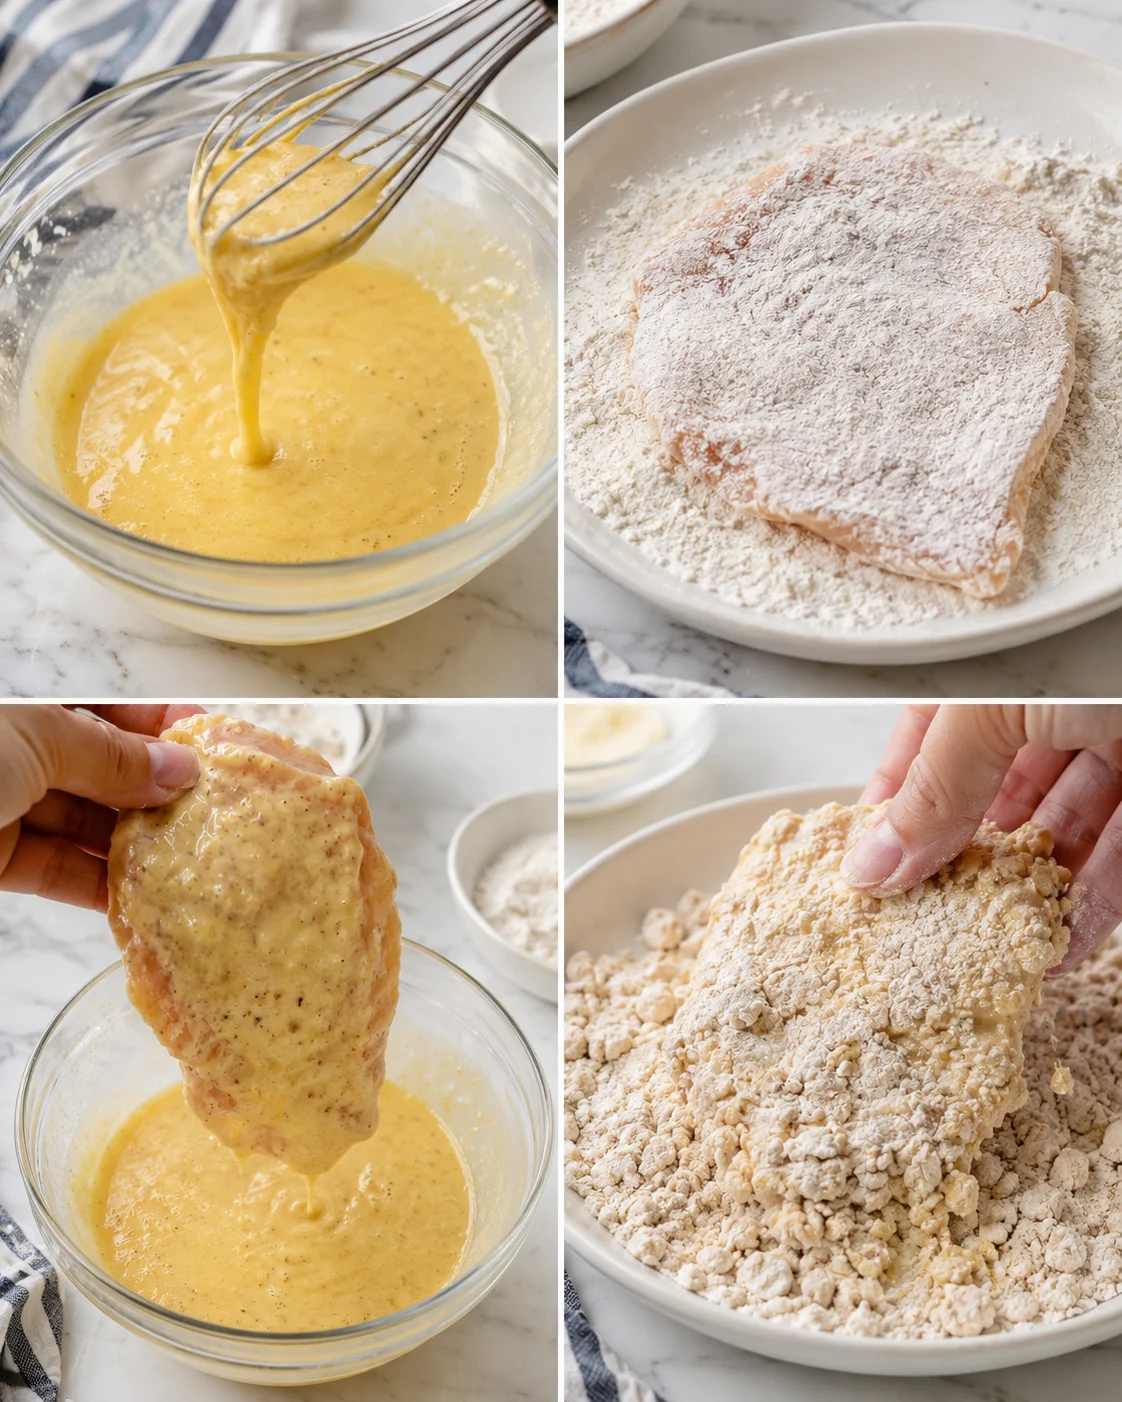
- Whisk the egg with 2 tablespoons almond (or skim) milk in a separate bowl and whisk about 1 tablespoon of the seasoned flour into the egg mixture to thicken it.
- Lightly dredge each chicken piece in the seasoned flour and set aside.
- Pour the remaining 1 1/2 tablespoons milk into the remaining flour mixture and mix until small clumps form.
- Dip the flour-coated chicken into the thickened egg wash, letting excess drip off.
-
Press each chicken piece into the clumpy flour mixture so it’s well coated; shake off any loose flour.
- Let the coated chicken rest about 5 minutes so the crust can set.
- Spritz both sides of the coated chicken lightly with cooking oil spray.
- Air fryer: preheat to 400°F and cook chicken 18–24 minutes (flip if needed) until internal temperature reaches 165°F.
- Oven: preheat to 400°F, place chicken on a greased baking sheet, bake 20 minutes, flip, then bake another 15–20 minutes until cooked through and crispy.
- Skillet: heat 2 teaspoons oil in a large skillet over medium, add chicken, and cook 7–10 minutes per side, adjusting heat so the breading browns without burning, until internal temperature reaches 165°F.
- Let cooked chicken rest 5–10 minutes to lock in juices and crisp the coating.
- Mix light mayonnaise with hot sauce to make the mayo spread.
- Toast hamburger buns lightly.
- Spread the mayo mixture on the bottom bun halves and top with dill pickle slices.
- Place the rested cooked chicken on the pickles, add more hot sauce if desired, and top with the bun caps.
Tips for Extra-Crispy Chicken
- Pat your chicken dry before breading. Moisture steals crispiness.
- Even thickness matters—pounding chicken helps it cook evenly without under- or over-cooked spots.
- Let the breaded chicken rest for 5-10 minutes before cooking. It helps the coating stick and prevents it from falling off.
- Spray the breading with oil right before cooking to promote browning and that golden crunch.
- Don’t overcrowd your air fryer or baking sheet. Give each piece room for hot air to crisp up the crust.
- Use a meat thermometer to make sure chicken hits 165°F—better safe and juicy than sorry!
- If you go the skillet route, keep heat moderate so the crust browns nicely without burning before the chicken cooks through.
- Toast your buns lightly to add sturdiness and keep your sandwich from turning soggy with all that mayo and pickles—or even a scoop of vinegar slaw (no mayo).
Flavor Swaps and Serving Ideas
- Spicy Nashville style: Add a tablespoon of cayenne and a pinch of brown sugar to your flour. Brush finished chicken with a hot cayenne butter for that classic heat, and serve with pickles and a Southern coleslaw with vinegar dressing.
- Korean-inspired: Swap mayo for a gochujang-mayo blend, sprinkle with sesame seeds and sliced scallions, and top with quick kimchi—or add a crunchy Asian cabbage slaw with sesame dressing. Yum!
- Chicken Parmesan: Add marinara and a slice of mozzarella over cooked chicken, broil just until melty, then serve on a toasted bun.
- Low-carb version: Wrap the chicken in lettuce leaves or use low-carb buns to keep carbs down.
- Protein swap: Use boneless skinless chicken thighs instead for extra juicy sandwich meat. Adjust cooking time and check for 165°F internal temp.
- Gluten-free: Use a 1:1 gluten-free flour blend and a gluten-free cornstarch alternative in the breading.
Storage and Reheating Guide
Keep any leftover chicken in an airtight container in the fridge for 3–4 days. Store buns, mayo, and pickles separately if you want to rebuild your sandwich later without sogginess. Or slice the leftover chicken into bite-size pieces and toss it into Kimchi Fried Rice with Chicken for an easy second-day meal.
To reheat and keep the crunch:
- Air fryer: Heat at 350°F for 3–6 minutes until warm and crispy again.
- Oven: Reheat at 375°F on a wire rack over a baking sheet for 8–12 minutes, flipping once if needed.
- Microwave: Quick but will soften the crust, so only for when you’re in a real hurry.
For freezing: Place cooled chicken pieces in a single layer on a baking sheet. Once frozen solid, transfer to a freezer bag and freeze up to 2 months. Thaw overnight in the fridge and re-crisp in the air fryer or oven before eating.
Common Questions Answered
- Q: Can I use chicken thighs instead of breasts? A: Absolutely! Thighs are juicier and more flavorful. Just shorten cooking time a bit and check that internal temperature reaches 165°F.
- Q: What’s the purpose of adding milk to the flour? A: Adding milk creates clumps in the flour mix that stick to the chicken and mimic that battered, fried texture. It’s what makes the breading extra crunchy without deep frying.
- Q: Can I skip the egg? A: The egg wash helps the flour and clumps stick. If you need an egg-free version, try a thick dairy-free yogurt or a flaxseed “egg” (1 tbsp ground flaxseed + 3 tbsp water, mixed and rested), though your texture might be slightly different.
- Q: How do I know when my chicken is done? A: Use an instant-read thermometer. When it hits 165°F internally, it’s fully cooked. The breading should be a beautiful golden brown and crisp.
- Q: Do I really need an air fryer? A: No! While the air fryer is the easiest and fastest method to get that crispy crust with minimal oil, the oven and skillet methods work well too. If you want another air-fryer option, try our High Protein Air Fryer Chicken Breast Sandwich.
- Q: How can I make this sandwich spicier? A: Add cayenne to your flour mix, stir extra hot sauce into your mayo, or brush finished chicken with a spicy butter sauce like Nashville hot sauce.
A healthier take on the classic fried chicken sandwich featuring crispy, craggy breading without deep frying, using a milk-infused flour mix and thick egg wash for better coating. Perfectly cooked in an air fryer, oven, or skillet, topped with creamy mayo, dill pickles, and served on toasted buns.
- Prep Time: 15 minutes
- Cook Time: 20 minutes
- Total Time: 35 minutes
- Yield: 4 sandwiches 1x
- Category: Main Course
- Cuisine: American
Ingredients
- 4 small boneless, skinless chicken breasts (or 2 large ones cut in half)
- 1/3 cup all-purpose flour
- 1/4 cup cornstarch
- 1 1/2 tsp garlic powder
- 1 1/2 tsp onion powder
- 1 1/2 tsp paprika
- 1 tsp kosher salt
- 1/2 tsp freshly ground black pepper
- 1/2 tsp cayenne pepper (optional for spicy version)
- 3 1/2 tbsp almond milk (divided) or skim milk
- 1 large egg
- Oil cooking spray
- 4 tbsp light mayonnaise
- 1–2 tbsp hot sauce (adjust to preference)
- 4 hamburger buns
- Dill pickle slices
Instructions
- Pound chicken breasts to even thickness and pat dry with paper towels; set aside.
- Mix flour, cornstarch, garlic powder, onion powder, paprika, kosher salt, black pepper, and optional cayenne pepper in a shallow dish.
- Whisk egg with 2 tablespoons almond or skim milk, then whisk about 1 tablespoon of the seasoned flour into the egg mixture to thicken it.
- Lightly dredge each chicken piece in the seasoned flour and set aside.
- Pour remaining 1 1/2 tablespoons milk into the remaining flour mixture and mix until small clumps form.
- Dip flour-coated chicken into the thickened egg wash, letting excess drip off.
- Press each chicken piece into the clumpy flour mixture to coat well; shake off loose flour.
- Let coated chicken rest about 5 minutes to set crust.
- Spritz both sides lightly with cooking oil spray.
- Cooking methods:
- — Air Fryer: Preheat to 400°F, cook chicken 18–24 minutes, flipping if needed, until internal temp is 165°F.
- — Oven: Preheat to 400°F, place chicken on greased baking sheet, bake 20 minutes, flip, bake another 15–20 minutes until done and crispy.
- — Skillet: Heat 2 tsp oil over medium, cook chicken 7–10 minutes per side, adjusting heat to brown crust without burning until 165°F internal temp.
- Rest cooked chicken 5–10 minutes to lock in juices and crisp crust.
- Mix light mayonnaise with hot sauce to create mayo spread.
- Toast hamburger buns lightly.
- Spread mayo mixture on bottom bun halves, top with dill pickle slices.
- Place rested chicken on pickles, add additional hot sauce if desired, and cover with bun tops.
Notes
Patting chicken dry and pounding to even thickness ensures better crispness and even cooking., Adding milk to seasoned flour creates clumps that mimic battered fried texture without deep frying., Thickened egg wash helps coating adhere better, improving crunchiness with less mess., Cooking methods include air fryer, oven, or skillet for versatility and to suit kitchen equipment., To maintain crispiness when reheating, use air fryer at 350°F for 3–6 minutes or oven at 375°F for 8–12 minutes on wire rack., Store leftover chicken in airtight container for 3–4 days; keep buns, mayo, and pickles separate to avoid sogginess., Freezing chicken pieces individually before bagging preserves texture; thaw overnight in fridge and re-crisp before eating., Flavor variations include spicy Nashville style, Korean-inspired with gochujang mayo and kimchi, and chicken parmesan with marinara and mozzarella.
Nutrition
- Serving Size: 1 sandwich
- Calories: Approximately 400 calories per sandwich (varies by toppings and cooking method)
- Fat: Approximately 12g per sandwich
- Carbohydrates: Approximately 30g per sandwich
- Protein: Approximately 35g per sandwich