Crispy Oven Fried Squash Recipe Easy Perfect Healthy Snack
Crispy Oven Fried Squash Recipe Easy Perfect Healthy Snack
The very first time I whipped up crispy baked squash, it was a total lifesaver on a hectic weeknight. I’d grabbed a big batch of summer squash at the farmer’s market, and honestly, I wasn’t sure how to use such a large amount without falling into the usual steamed or sautéed routine. Then it hit me: why not oven-fry it to get that perfect golden crunch without the heavy oil of deep frying? It was a game-changer—crispy, flavorful, and just the kind of snack that feels like a treat but doesn’t wreck your healthy eating plans.
Since then, this crispy oven fried squash recipe has been my go-to whenever I want a quick, crunchy, and satisfying bite. It’s a smart way to enjoy fresh squash without tons of oil or cleanup. Plus, it’s a total hit with the kids—my nephew actually begged for more, which for any mom feels like a huge win!
What really makes me love this recipe is how it takes simple squash and transforms it into a snack that tastes like something special you’d find in a trendy spot, but way better for you. Whether you’re feeding a busy family, throwing together a simple appetizer for friends, or craving a bit of crunch, this crispy oven fried squash ticks all the boxes. It’s straightforward, healthy, and honestly, a little addictive once you get that satisfying crisp on each slice.
Over time, I’ve played around with this recipe, testing different coatings and seasonings to find the perfect balance of flavor and crunch. After trying a bunch of oven-fried veggie recipes, I can confidently say this one stands out—it’s never greasy or soggy, and it always delivers on taste. If you’re after a healthier twist on classic fried snacks without losing that crispy goodness, this is going to become your new favorite.
If you want a snack or side that’s crunchy, bursting with flavor, and keeps things light, this crispy oven fried squash is definitely worth making. I love that it turns plain squash into something memorable with just a handful of easy ingredients and minimal effort. The crisp texture, the savory seasoning, and that little cheesy note make it a total crowd-pleaser.
Feel free to customize it to your taste by swapping spices or trying different breading—cooking should always be about what fits your family’s style and flavor preferences. I hope this recipe becomes a staple in your kitchen like it has in mine. I’d love to hear how your crispy baked squash turns out and any fun twists you come up with along the way!
Happy cooking and crunching!
FAQs About Crispy Oven Fried Squash
Can I use other types of squash for this recipe?
Definitely! Winter varieties like butternut or delicata squash can work if sliced thinly, though summer squash like zucchini or yellow squash are best for quick baking and that perfect crisp.
How do I keep the squash from getting soggy?
Make sure to pat the slices dry before breading and avoid crowding your baking pan. Flipping them halfway through baking helps both sides get nice and crunchy.
Is this recipe suitable for a gluten-free diet?
Absolutely! Just swap the all-purpose flour and panko breadcrumbs with gluten-free versions, and you’re all set.
Can I make this recipe ahead of time?
You can prep and bread the squash a few hours ahead and keep it refrigerated. Bake just before serving to keep that crispy texture.
What dipping sauces pair well with crispy oven fried squash?
Garlic aioli, ranch, spicy sriracha mayo, or a fresh lemon yogurt dip all complement these crunchy bites beautifully.
Notes
Drying the squash slices before breading makes a big difference in keeping them crispy. Don’t crowd your baking sheet, or the slices steam instead of crisp. Remember to flip halfway to get a nice even crisp on both sides. For gluten-free, use suitable flour and panko swaps. For dairy-free, skip parmesan or substitute nutritional yeast. Leftovers reheat best in a hot oven—skip the microwave if you want to keep things crunchy.
- Prep Time: 10 minutes
- Cook Time: 20-25 minutes
- Category: Snack
- Cuisine: American
Nutrition
- Serving Size: About 6-8 slices per serving
- Calories: 150-180 kcal
- Sugar: 3-4 g
- Sodium: 250-350 mg
- Fat: 7-9 g
- Saturated Fat: 2-3 g
- Carbohydrates: 18-22 g
- Fiber: 2-3 g
- Protein: 6-8 g
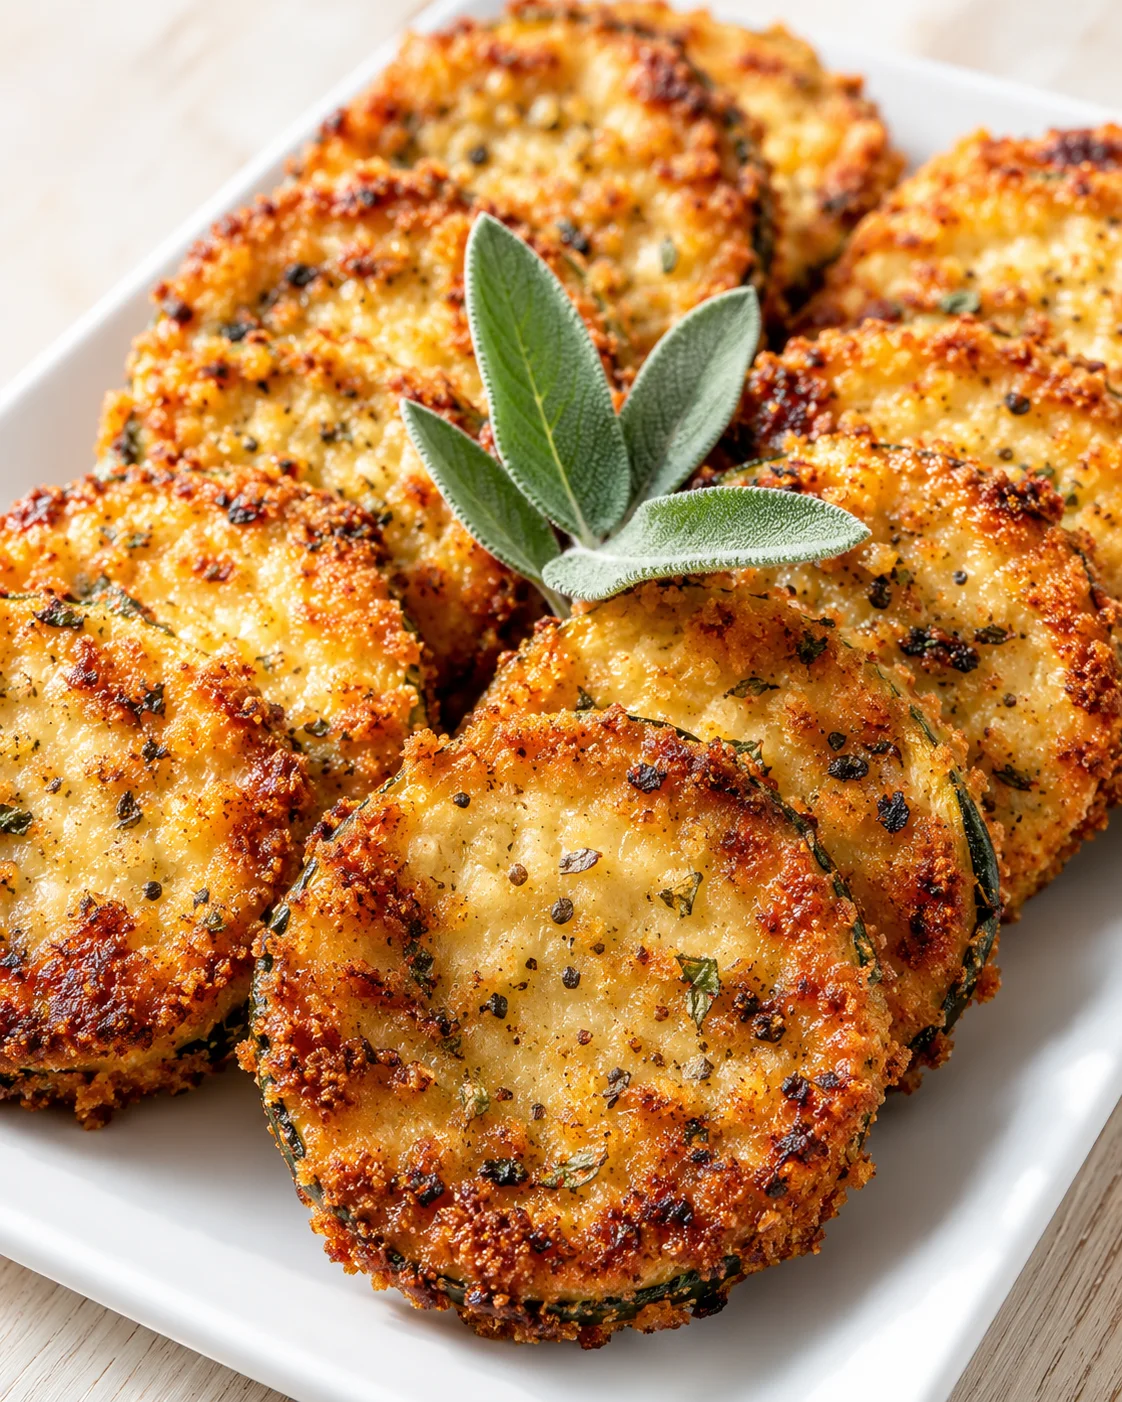
Looking for a quick and healthier way to enjoy a crunchy fried snack? This crispy baked squash recipe gives you golden, perfectly crusted rounds with a hint of parmesan—all in about 30 minutes. It’s an easy way to turn your everyday summer squash into a snack or side dish that feels indulgent without the greasy deep-fry mess.
In this post, I’ll walk you through every step: from a simple ingredient list that’s mostly pantry basics plus fresh squash, to the step-by-step method including the best oven temperature and the trick of flipping halfway through cooking. You’ll also get expert tips for maximum crispiness, easy swaps for gluten- or dairy-free diets, and clever ideas for serving and storing any leftovers.
- Hands-on time: around 10 minutes; total time: about 30 minutes (includes 20–25 minutes baking).
- Key techniques: pat squash dry, bread in three steps (flour, egg, breadcrumb + parmesan), bake high and hot at 425°F (220°C), flip halfway through for even color.
- What to expect: a light, crispy crust, savory parmesan flavor, and a kid-friendly snack that goes great with dips like garlic aioli or ranch.
Why This Snack Works
- Fast & Easy: Ready in around 30 minutes from start to finish—perfect for busy nights or last-minute snacks.
- Simple Ingredients: Uses staples you probably have and fresh squash. No fancy ingredients needed.
- Versatile Snack or Side: Excellent for casual dinners, game days, or just munching anytime. It also pairs beautifully with Healthy Zucchini Lasagna with Ground Turkey for a lighter comfort-food dinner.
- Kid-Approved Crunch: The crispy texture and savory coating make it a hit even with picky eaters.
- Amazing Crispiness: Thanks to oven-frying and a light parmesan-panko coating, these come out golden and crunchy, never greasy or soggy.
- Healthier than Deep Frying: Uses just a touch of oil to crisp up in the oven, keeping things light and nutritious.
What really sets this recipe apart is the coating—panko breadcrumbs mixed with parmesan cheese give a wonderful nutty note alongside unbeatable crunch. Seasoning the squash well before baking draws out its natural sweetness and perfectly balances the crispy coating. It’s one of those recipes that feels a bit indulgent but leaves you feeling good about what you’re eating.
I’ve served it at family dinners and casual gatherings, and it always disappears fast. For another easy crowd-pleaser, try Spicy Tuna Salad Bites. There’s something so satisfying about that first crunchy bite—classic comfort food vibes with a fresh, light twist. If you’ve ever wished for a crunchy fried snack without the guilt, this crispy baked squash recipe is just what you need.
Simple Pantry-Friendly Ingredients
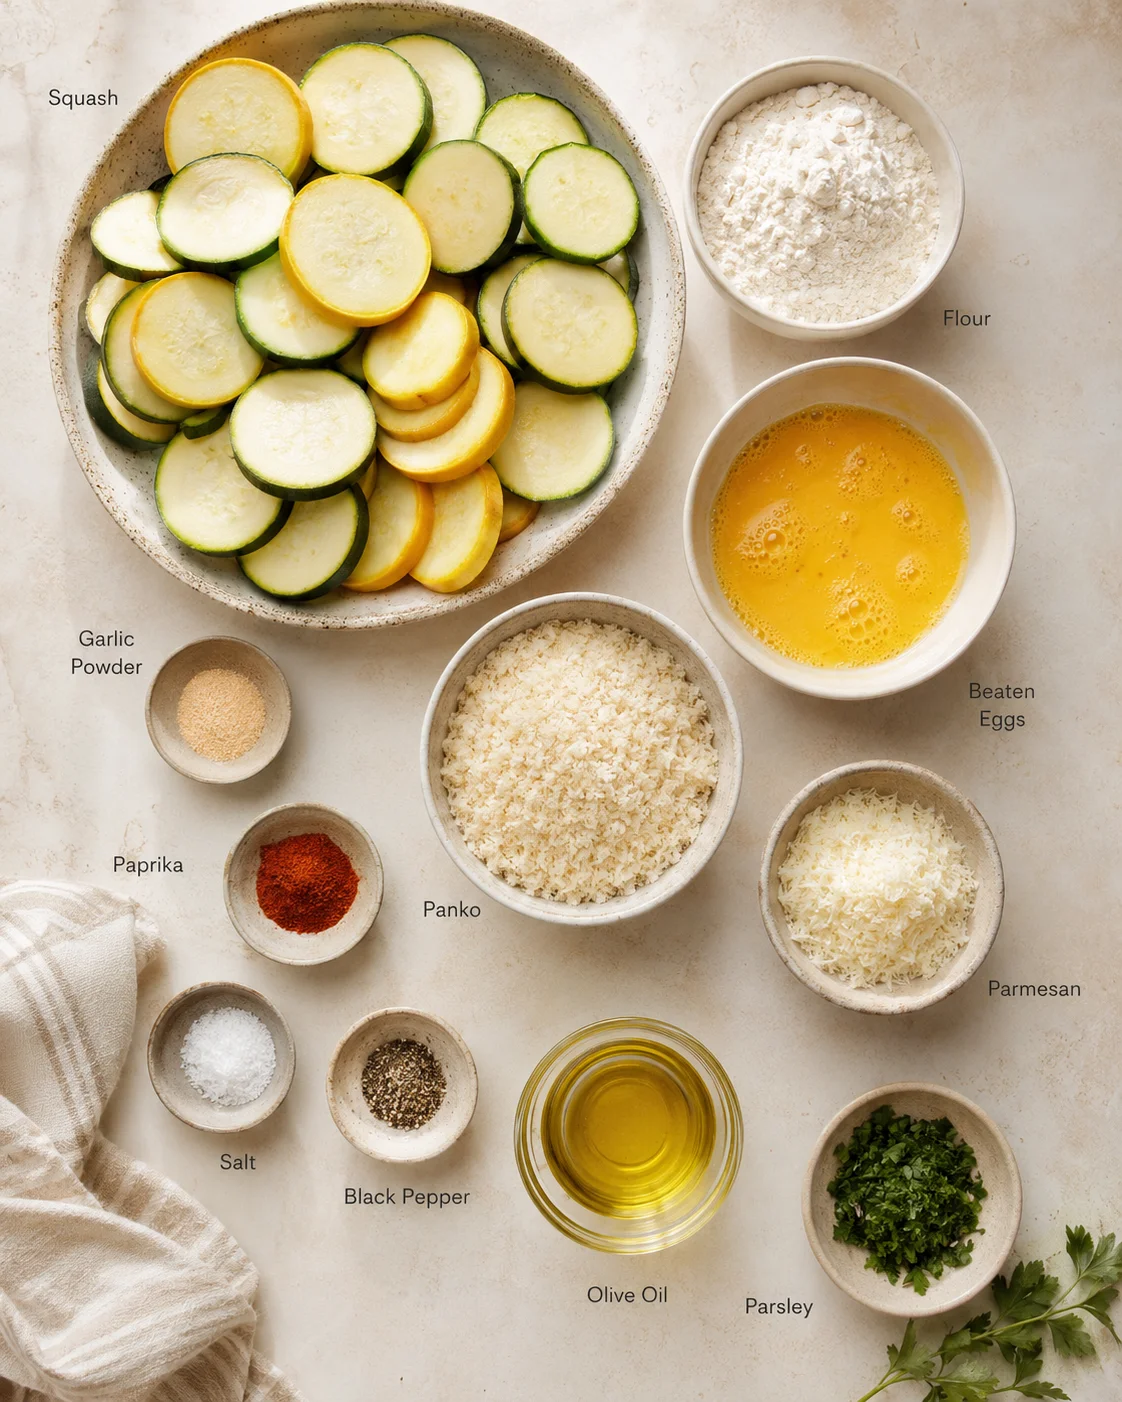
- 3 medium zucchinis or yellow squash, sliced into 1/4-inch thick rounds
- 1/2 cup all-purpose flour (60 g)
- 2 large eggs, beaten
- 1 cup panko breadcrumbs (about 100 g)
- 1/4 cup grated parmesan cheese
- 1 teaspoon garlic powder
- 1 teaspoon paprika
- Salt and freshly ground black pepper, to taste
- 2 tablespoons olive oil or avocado oil
- 1 tablespoon fresh parsley, chopped (optional)
How to Oven-Fry Squash
- Preheat oven to 425°F (220°C) and line a rimmed baking sheet with parchment paper or a silicone mat.
- Wash squash, pat dry, and slice into even 1/4-inch (6 mm) rounds.
- Beat the eggs in a shallow bowl.
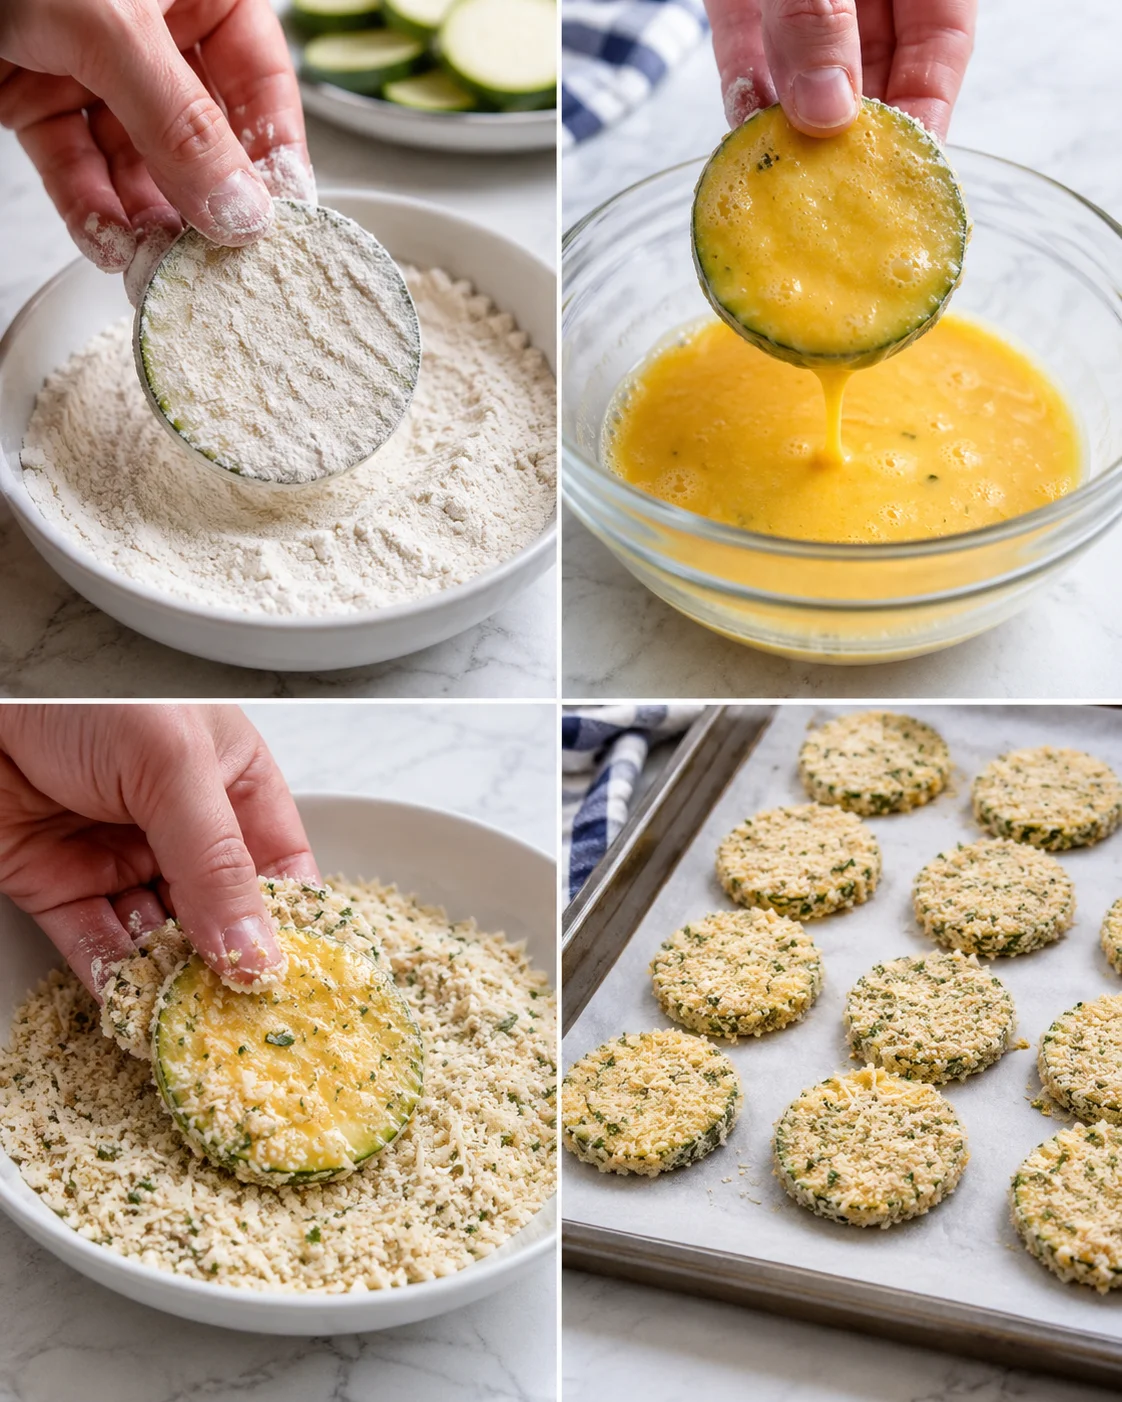
- Place flour in one shallow bowl, beaten eggs in a second, and mix panko, grated parmesan, garlic powder, paprika, salt, and pepper in a third.
- Lightly coat each squash slice with flour, shaking off excess.
- Dip the floured slice into the beaten eggs, allowing excess to drip off.
- Press the slice into the breadcrumb mixture, coating both sides.
-
Arrange coated slices in a single layer on the prepared baking sheet (or on a wire rack set over the tray), avoiding crowding.
- Brush or lightly drizzle olive or avocado oil over the tops of the slices.
- Bake at 425°F (220°C) for 20–25 minutes, flipping the slices gently with tongs or a spatula about halfway through (around 12 minutes).
- Remove from the oven and let cool briefly to set the crisp coating.
- Sprinkle with chopped fresh parsley if desired and serve warm.
Tips for Extra Crispiness
Nailing perfectly crispy baked squash takes a little practice, but with these tips, you’ll get it just right:
- Dry those slices well. Any extra moisture means soggy breading. After slicing, pat dry with paper towels.
- Don’t skip the flour step. It helps the egg and breadcrumbs stick better, so the coating won’t slide off as it bakes.
- Choose panko breadcrumbs. They’re lighter and crisp up better than regular breadcrumbs, giving that great crunch.
- Use just a light brush of oil. Too much oil makes it greasy; a little helps get that golden crust.
- Flip halfway through baking. This makes sure both sides get beautiful, even browning and crisp.
- Keep your oven at 425°F (220°C). Lower temps dry out the squash without crisping it, and too high can burn the outside before the inside cooks.
- Try using a wire rack on the baking tray. It helps air circulate around the squash for more even crisping.
I’ll never forget the one time I forgot to flip, and the bottoms got soggy—definitely a learning moment! Adding a bit of parmesan into the breadcrumb mix not only boosts flavor but helps the crust brown beautifully—a trick you also see in parmesan-crusted tilapia. I used to worry the squash would get watery, but it’s really that drying step plus baking at high heat that saves the day—the same principles behind crispy roasted frozen vegetables.
While the squash bakes, you can prep a quick dipping sauce or set out plates—makes great use of that baking time so you’re ready to serve right away.
Tasty Twists and Swaps
Feel free to get creative with this crispy oven fried squash. Here are some tasty twists to try:
- Add some heat: Throw in cayenne or chili powder to the breadcrumb mix for a spicy kick. I love pairing this version with ranch for cooling balance, or a side of tangy vinegar coleslaw (no mayo).
- Gluten-free: Swap the flour and panko for gluten-free options. It still crisps up wonderfully.
- Herb-infused: Toss in dried or fresh herbs like thyme, oregano, rosemary, or basil to the breadcrumb mix for an aromatic flair. Fresh basil makes it wonderfully summery!
- Cheese swap: Mix in sharp cheddar or asiago cheese instead of parmesan for a different cheesy twist.
- Air fryer shortcut: If you have an air fryer, cook the breaded squash slices at 400°F (200°C) for about 10-12 minutes, flipping halfway. You’ll get similarly crispy results with less oven time; for extra tips on crisping breaded veggies in the air fryer, see this crispy air fryer fried pickles recipe.
Don’t hesitate to experiment! I once added smoked paprika and a pinch of cumin for a southwestern twist that went perfectly with a fresh tomato salsa on the side.
Serving and Storing Tips
This crispy baked squash is best enjoyed warm, fresh from the oven, when the crust is at its peak crunch. Serve alongside your favorite dips like garlic aioli, spicy mayo, or a tangy yogurt sauce. It pairs nicely with grilled chicken or alongside a crisp green salad for an easy meal—and it also works with a quick, vegetable-forward main like this Wholesome Veggie Stir Fry.
If you’re serving it as a snack or appetizer, arrange the slices on a pretty platter and garnish with chopped parsley or a dusting of extra parmesan, or round out your spread with Ultimate Crispy Cabbage & Onion Fritters. They also shine as a side for laid-back dinners or BBQs.
For storing leftovers, pop them in an airtight container in the fridge for up to 2 days. To warm, reheat in a 375°F (190°C) oven for 5-8 minutes to refresh the crunch—microwaving will make them soggy, so try to avoid that.
Leftovers develop deeper flavors after chilling, so the taste stays great even if the crunch softens a bit. For longer storage, freeze the baked slices on a tray, then transfer to a freezer-safe container. Reheat from frozen in the oven for best crispness.

Questions & Quick Answers
-
Can I use other types of squash for this recipe?
Yes, summer squash like zucchini or yellow squash work best for quick baking and crisp results. Firmer winter squashes like butternut or delicata can be used if sliced thinly and baked longer since they are denser and less moist. If you love butternut, try it in this creamy butternut squash ravioli sauce for another delicious use.
-
How do I keep the squash from getting soggy?
Make sure to pat dry the slices really well, don’t crowd your baking sheet, bake at 425°F (220°C), and flip halfway for even browning. Using panko and brushing lightly with oil also help keep things crispy.
-
Is this recipe suitable for gluten-free or dairy-free diets?
Absolutely. Swap all-purpose flour and panko for gluten-free versions, and omit parmesan or replace with nutritional yeast for dairy-free. The texture and flavor hold up well with these changes.
-
Can I prep this recipe ahead of time?
You sure can! Slice and bread the squash a few hours before baking, store covered in the fridge, then bake just before serving to keep them crispy. You can also freeze cooked leftovers for later.
-
What’s the best way to reheat leftovers to keep them crispy?
Pop them into a 375°F (190°C) oven for 5-8 minutes to bring back the crunch. Avoid microwaving since it tends to soften the coating.
-
Can I cook these in an air fryer?
Yep! Cook at 400°F (200°C) for 10-12 minutes, flipping halfway through. It’s a great shortcut to crispy, baked squash.
-
How long can I store leftovers?
Keep them in the fridge up to 2 days in an airtight container. For longer storage, freeze on a tray first, then move to a freezer bag. Reheat from frozen in the oven for the best crunch.
-
What tips make the coating stick better?
Use the three-step dipping process: flour, then egg, then breadcrumb mixture. The thin flour layer helps the egg and crumbs stick and keeps the coating firmly attached during baking. For a quick walkthrough of the same breading technique, see this step-by-step crispy chicken sandwich recipe.
-
What dipping sauces work well with crispy oven fried squash?
Classic garlic aioli, ranch dressing, spicy sriracha mayo, or a fresh lemon yogurt dip all pair wonderfully. If you like something tangy, ketchup or tomato salsa also works great.
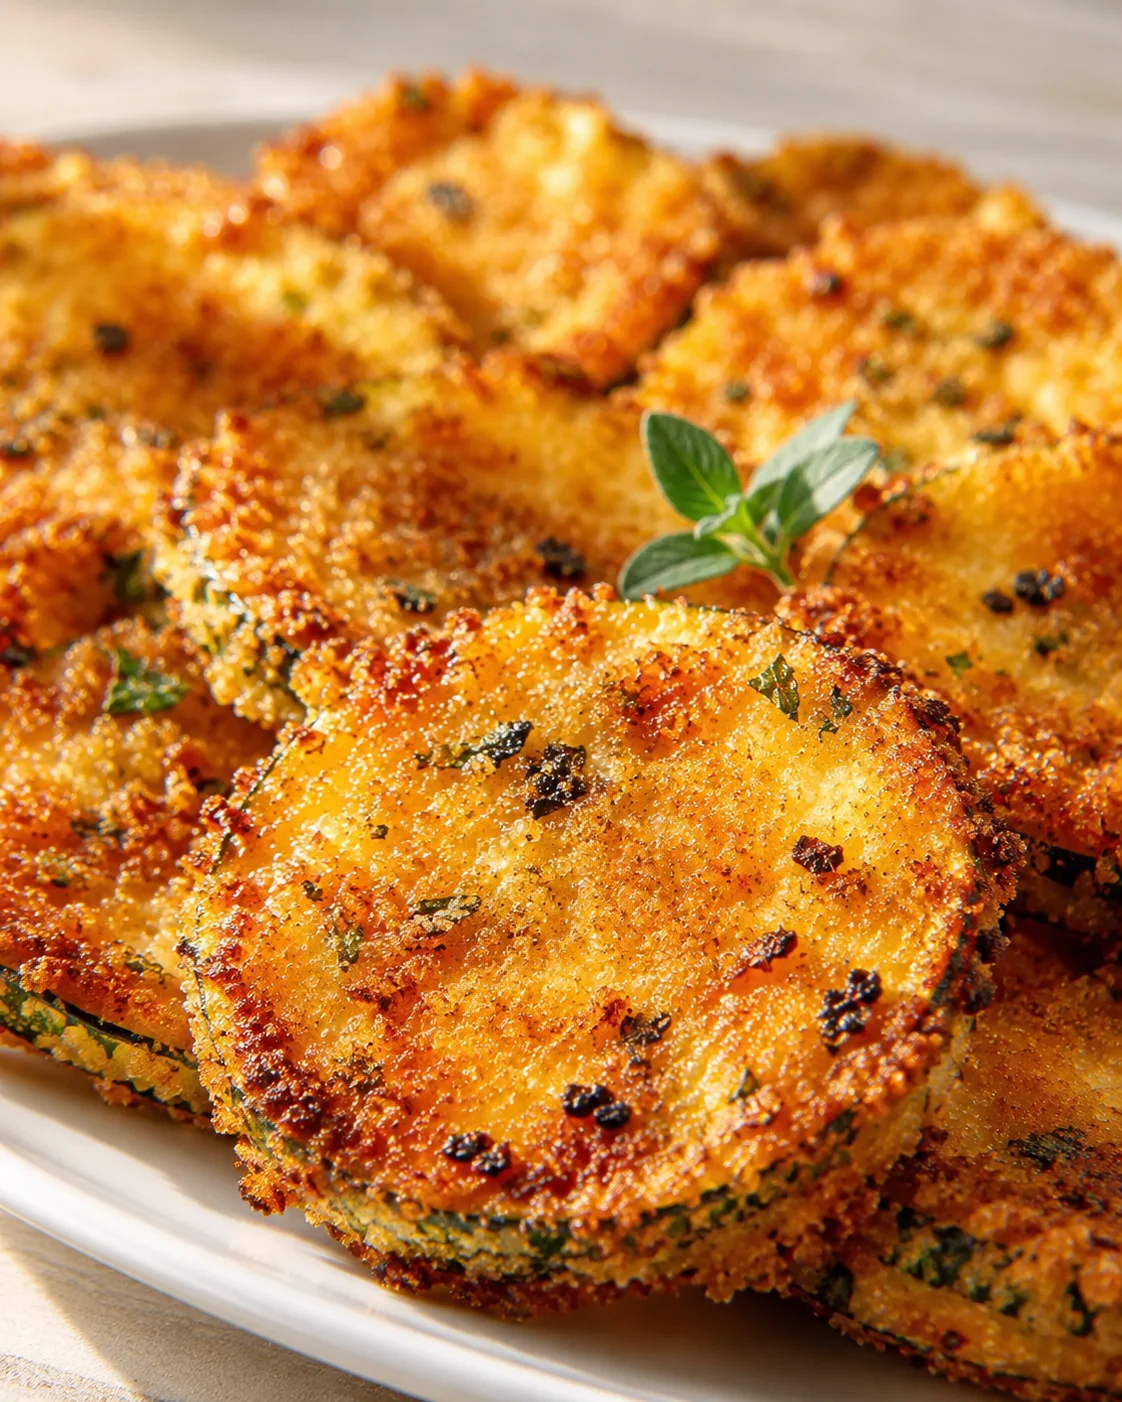
A quick and healthy snack featuring golden, crunchy oven-fried summer squash coated with panko breadcrumbs and parmesan cheese. Perfect for snacking or as an easy side dish with minimal oil and mess.
- Total Time: 30-35 minutes
- Yield: 4-6 servings 1x
Ingredients
- 3 medium zucchinis or yellow squash, sliced into 1/4-inch thick rounds
- 1/2 cup all-purpose flour (60 g)
- 2 large eggs, beaten
- 1 cup panko breadcrumbs (about 100 g)
- 1/4 cup grated parmesan cheese
- 1 teaspoon garlic powder
- 1 teaspoon paprika
- Salt and freshly ground black pepper, to taste
- 2 tablespoons olive oil or avocado oil
- 1 tablespoon fresh parsley, chopped (optional)
Instructions
- Preheat oven to 425°F (220°C) and line a rimmed baking sheet with parchment paper or a silicone mat.
- Wash squash, pat dry, and slice into even 1/4-inch (6 mm) rounds.
- Beat the eggs in a shallow bowl.
- Place flour in one shallow bowl, beaten eggs in a second, and mix panko, grated parmesan, garlic powder, paprika, salt, and pepper in a third.
- Lightly coat each squash slice with flour, shaking off excess.
- Dip the floured slice into the beaten eggs, allowing excess to drip off.
- Press the slice into the breadcrumb mixture, coating both sides.
- Arrange coated slices in a single layer on the prepared baking sheet, avoiding crowding.
- Brush or lightly drizzle olive or avocado oil over the tops of the slices.
- Bake at 425°F (220°C) for 20–25 minutes, flipping the slices gently with tongs or a spatula about halfway through (around 12 minutes).
- Remove from the oven and let cool briefly to set the crisp coating.
- Sprinkle with chopped fresh parsley if desired and serve warm.
Notes
Drying squash slices well before breading is essential to keep them crispy., Avoid crowding the baking sheet to prevent sogginess., Flip slices halfway through baking for even crispness and browning., For gluten-free, substitute all-purpose flour and panko breadcrumbs with gluten-free alternatives., For dairy-free, omit parmesan or replace with nutritional yeast., Leftovers reheat best in a 375°F (190°C) oven for 5-8 minutes; avoid microwaving to maintain crispiness.
- Prep Time: 10 minutes
- Cook Time: 20-25 minutes
- Category: Snack
- Cuisine: American
Nutrition
- Serving Size: About 6-8 slices per serving
- Calories: 150-180 kcal per serving
- Fat: 7-9 g per serving
- Carbohydrates: 18-22 g per serving
- Protein: 6-8 g per serving